


Vape Coil Building Information Centre

Welcome to the information centre for building vape coils! This is part 1 of a 2 part series, on this page you will find a complete and comprehensive introduction for beginners to gather all the tools, supplies and knowledge to start building vape coils, which we will walk you through in part 2: Build a Vape Coil in 7 Easy Steps!!
Index
- What are Vape Coils?
- Vape Coil Building Supplies
- Tools for building Vape Coils
- What Atomizer and Mod setup should you use?
- What is Ohms law, Power and Voltage?
- Power Supplies – Amps & Regulated vs Unregulated batteries
- What wire should I use? – Pros and Cons
- How to decide what you want from DIY Coilss
- How to Plan & Calculate your Vape Coil
- Micro vs Macro Coils
- How to get the most value out of your coil and cotton
What are Vape Coils?
Building your own E-Cig coils is far cheaper than buying stock coils that are made by the manufacturer for a specific device. In this Coil Building Guide we will talk through and explain the key points to get you building your own coils as soon as possible. By the end of this guide you should be able to confidently build your own DIY vape coil.
Some of us in the office can go through a regular 0.15ohm stock coil every 2-3 weeks at around £3 or more per unit. However, if you buy 30ft of Spooled Kanthal wire and a 10 pad packet of Muji cotton, it should net a new coil builder at least 40 regular coils for £4.48 (from Vapable.com). The cost depends on how much wire and cotton you use; some advanced users in our office can get 100 coils out of those same two products. Let’s estimate the costs after using 100 £3.00 stock coils versus 100 DIY coils an advanced builder would make:
Stock coil price, after 100 coils: £300
DIYVape coil price, after 100 coils: £4.48 (from Vapable.com)
This estimate is assuming some very reasonable parameters:
- An average of 15cm of wire is used per vape coil
- Each wire coil gets new cotton 3 times before the wire coil is replaced
- 0.5cm wide, full length strips of Muji cotton is used for each coil
For 100 coils, you only need one 30ft spool of wire and one pack of Muji cotton (10 pads).
Here’s a quick breakdown of the steps involved in building your own coil:
- Acquire an RDA (Rebuildable dripping atomizer) or an RTA (Rebuildable tank atomizer).
- Wrap a length of wire around a 3mm jig or screwdriver to create a tightly wound coil.
- Install the vape coil in your chosen atomizer by tightening the screws down on the legs of the coil.
- Thread cotton through the centre of the vape coil, after that, if you’re using an RTA you will need to cut and manipulate the cotton so it fits the wicking holes.
- Soak the cotton in E-liquid, and then begin adjusting the power you’re firing the device at to find your perfect vaping experience.
Now we will go through, step by step, item by item describing what they are, why you need them, and explaining how you can begin creating your own vape coils. The following is separated into two sections: supplies and tools. Supplies are the materials that are replaced at your discretion, and tools, which can last a lifetime, for every coil you will ever make.
Vape Coil Building Supplies
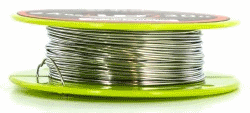
Spooled Wire or Premade Coils
Spooled wire is a metal wire, wrapped around a spool. It will need to be bent into a coil before you can install it in your RDA/RTA; this done with a guided wrapping tool or coil jig, which we will talk about later. You will need to un-spool and cut wire to fit your needs each time you want to make a vape coil. Or cut it all up into reasonable lengths in one session and store them for later. We recommend new user’s to use kanthalwire.
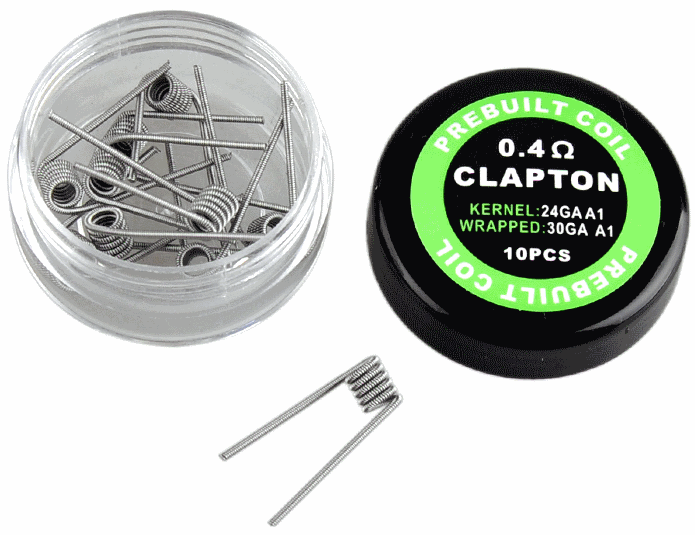
Premade coil is just spooled wire that has already been bent into shape using a process not dissimilar from the one you would have done at home anyway. But they are machine made and very neat. These a nice time saving option as its quick and easy to plug in and gets you started right away.
The price difference between these two options is nothing like the chasm between stock coils and homemade ones, but spooled wire still a great way of looking after the pennies if you want to go totally down the DIY route.
Cotton
A generous amount of processed, unbleached, preferably organic cotton will be threaded directly through the centre of your coil. The cotton then acts as a middleman for the heat and e-liquid. It soaks up the liquid that has been dripped into the RDA/RTA, ready to be heated by the coil itself. Muji Cotton is an excellent product.

Tools for building Vape Coils
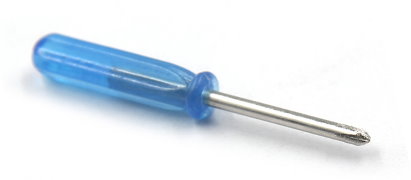
Mini Screwdriver or Allen Key
Tools are usually supplied with the device, but if you can’t find yours or didn’t get any, just check the build deck and work out which tool you’ll need. Most commonly you will need a mini Phillips head screwdriver or an Allen key. This tool will be used for screwing in your posts and can also be useful to poke around your cotton and in place it neatly within the coil, exactly how you want. There are also ‘plug and play’ build decks that do not require tools.
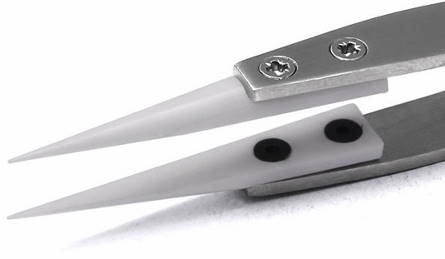
Ceramic Tipped Tweezers
It’s important you have ceramic tipped tweezers as ceramic does not conduct electricity. This offers you greater protection when adjusting your coils as you will be testing them after they have been fitted on your RDA.
Testing vape coils involves poking and squeezing them to make sure they heat evenly and there are no particularly hot spots that are heating up quicker than other parts. It is unsafe to use a conductive material to squeeze your coil and power it at the same time.
Ohm Meter or Ohm Reading Device
Ohm meters are affordable and portable. A unit with a 510 thread connection will for most devices, but check your RDA/RTA to work out what kind of connection will fit best. Alternatively, if your e-cig mod can measure ohms then simply find the reading from there instead.
Coil Jig
The coil jig is used to wrap your wire, if you have chosen to go down the more independent road of not buying premade coils. There are two tools for this:
- A Guided Wrapping Tool which creates carefully crafted coils with as many perfect wraps as you need. If the guided coil jigs are too pricey or not what you want, there is another way.
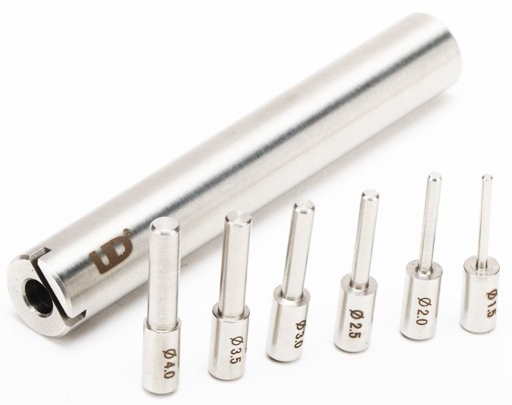
- A Micro Coil Jig, which is essentially just a metal spike with gradually decreasing diameters for you to wrap around. Some people have used drill bits and screwdrivers to wrap their wire, however we wouldn’t recommend a beginner to do this. Aside from the obvious safety concerns, the diameter of your vape coil is important as it will help you calculate the total resistance. Without knowing the exact measurements creating the perfect coil becomes a lot more difficult.

Nail Clipper or Wire Cutter
If you’re using spooled wire you will need to cut the wire down to a size you can work with each time you make a new coil. Even if you’re using a premade coil, you will usually have to trim down the legs after the coil has been fitted on your build deck.

What Atomizer and Mod setup should you use?
RDA/RTA
An RDA (rebuildable dripping atomizer) or RTA (rebuildable tank atomizer) is what the vape coil will be installed in and vaped through. These are usually made from stainless steel and comprise of 3 main features:
- A build deck. The build deck is a platform for the coils to be held in place and allow them to receive power, in most cases the vape coils are held in place by two screws in posts (small pillars with a hole through), one for each leg of the coil.
- A juice well. The ‘juice well’ is the bowl where the cotton and e-liquid will sit,allowing the cotton to soak up all the juice.
- A mouthpiece. This is where you inhale the vapour from. In many cases it is detachable from both the build deck and into two pieces itself, separating so that the build deck and cotton is walled in while the top is removable. This achieves greater safety from the coil’s heat, allows easy access to drip more E-liquid onto the cotton & coil, makes cleaning easier and adds more leak resistance.
Our recommendation for an RDA would have to be the Vandyvape 24 Pulse BF RDA. This RDA works perfectly with micro coils, which we’ll discuss later.

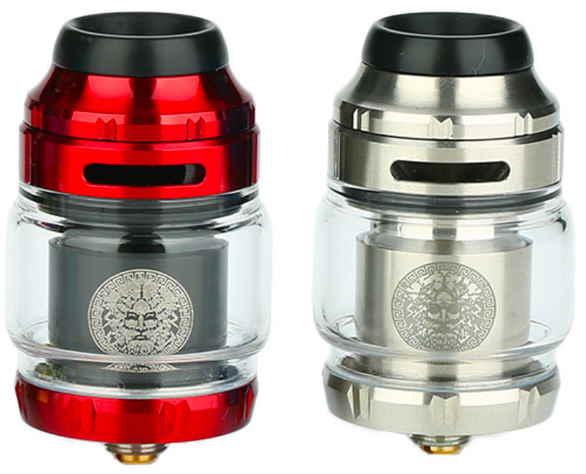
If it’s an RTA, you’ll also have a tank for liquid on top of this build deck and juice well instead of a mouth piece. Just like a regular tank atomizer. RTA’s are essentially the same thing as RDA’s, except RTA’s have a tank of e-liquid stored which will saturate your cotton automatically throughout the day. RTA’s have wicking holes, they are small holes for liquid to transfer from the tank to the cotton, these holes must be aligned with the cotton to work; it can be tricky getting it right but precision comes with experience.
For a solid and reliable RTA, try the Geekvape Zeus X RTA Tank.
E-cig Mod
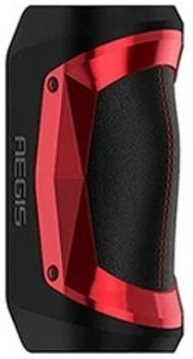
An E-cig mod is simply a power supply, or a home for batteries that will supply the power. Some mods have internal batteries that will allow you to charge the device without being able to remove the batteries; on the other hand there are mods that will only work if they have 1-2 18650 batteries plugged into them.
If you don’t have either an E-cig mod that is powerful enough for the kind of vaping experience you want, and would like to move into sub ohming, we would recommend the GeekVape Aegis Mini 80W TC Box Mod. This regulated mod is excellent, versatile (works in TC mode and regular wattage mode) and doesn’t even require batteries, it boasts an internal 2200mAh battery.
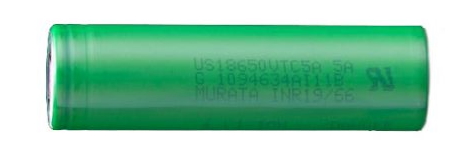
However if you use or want a mod that requires an 18650 battery or two, you should use this you should go for our favourite, the Sony VCT5A 18650. It comes with free safety Carry Case Included!
What is Ohms law, Power and Voltage?
Before you begin, you must become familiar with some electrical principles and Ohm’s Law, which is a central topic of this vape coil building guide, vaping in general and coil building beyond vaping. This is because after you’ve built and installed your wire coils, they need power to heat up. This is achieved by passing power through the wire. Here are some definitions, which are fairly difficult to grasp so we’ll explain further afterwards. It is tough, so don’t expect to understand immediately.
- Resistance is measured in Ohms. Resistance is a measure of the opposition to current flow in the circuit.
- Power is measured in Watts. Watts are used to specify the rate at which electrical energy is dissipated.
- Voltage is measured in Volts. Voltage, also called electromotive force, is a quantitative expression of the potential difference in charge between two points in an electrical field
Resistance (Ohms, Ω)
Every wire has a resistance. Resistance is determined by properties of the wire, such as diameter, thickness, or material. This is called the gauge, also represented by AWG or mm. The higher the AWG, the thinner the wire is. Resistance is like water in a pipe. Imagine a bath being drained, how long does the water take to fully drain? If you have a 20cm diameter plug and pipe then water will pass through much quicker than 5cm diameter plugs and pipes, because there is more room for it (less resistance). 20 AWG wire is thicker than 30 AWG wire, which means more electricity can pass through easier.
If you built a vape coil with 20 AWG wire, wrapping it 10 times, then the resistance would end up around 0.4Ω. If you did the same 10 wraps, but used a 30 AWG wire then the final resistance would be around 3.1Ω. Resistance can be lowered by using thicker wire (lower gauge/AWG/mm), longer wire (more coil wraps) or different materials of wire. For example, SS316L / Elite wire has less resistance than Kanthal A1 wire of the same AWG.
Power (Watts, P) & Voltage (Volts, V)
When we have built a vape coil, installed it on our build deck and it has a readable resistance, we need to figure out how much power should power it; based on your preference of flavour, vapour and heat. This power is measured with watts & volts, which are relative to each other, current and resistance. Wattage is what you will be inputting into your device’s power settings, unless you’re using temperature control mode. It’s much quicker, easier and safer to estimate how many watts you need by calculating rather than guesswork alone.
3.7 volts is usually about right for resistances above 0.3 ohms. Therefore this is a good starting place for estimating how many watts you will need. So assuming 3.7 volts is our sweet spot, we should calculate how many watts it takes to get 3.7 volts from our vape coil. For example, if you make a 0.5ohm coil and want to figure out how many watts it takes to get to 3.7 volts, we will calculate watts by using the equation:
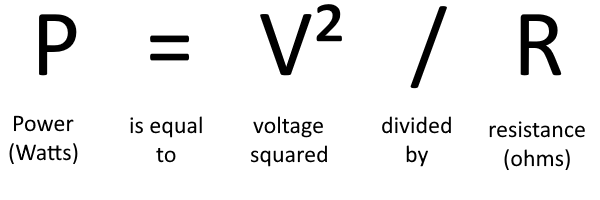
Watts = (3.7 volts x 3.7 volts) ÷ 0.5 ohms, which comes out at 27.38, our Wattage level at 3.7V.
Here are some more examples of the watts required for different volts, at different ohms.
| Power (Watts) | Voltage | Resistance (Ohms) Ω |
| 70.56 | 4.2 | 0.25Ω |
| 29.09 | 4 | 0.55Ω |
| 16.10 | 3.7 | 0.85Ω |
| 13.69 | 3.7 | 1Ω |
| 10.53 | 3.7 | 1.3Ω |
A potential hurdle in finding your sweet spot is the amount of current, measured in amps, that your device can produce. If you have a purpose built, higher end mod then this shouldn’t be an issue to you. More information on this is in the next section.
Power Supplies – Amps & Regulated vs Unregulated batteries
Regulated vs Mechanical Power supplies
The most important consideration when picking out a device is whether it is electrically ‘regulated’ or ‘unregulated’, which are specific electrical hardware terms, after reading this vape coil building guide, you will understand these names. The term ‘mechanical’ mod is just another name for an ‘unregulated’ mod; these two words are interchangeable for the same item. So what’s the difference between regulated and unregulated batteries?
Regulated power supplies have amp regulators on their output. This regulator ensures the output will always stay steady at the set value of the power supply, regardless of the current that the device is firing at.
Whereas unregulated devices, often referred to as mechanical mods, do not have this capability, meaning they can pass through more power than intended. Beginner’s, and even advanced users, that aren’t fully prepared to use the device should not attempt use mechanical mods; especially without the proper electrical knowledge, handling and due diligence.
You can tell if a device is regulated by whether it has an interface that allows you to change the power output, unregulated devices do not have this capability, and they only fire at their maximum output.
If you’re new to this you should definitely use a regulated device and not a mechanical or unregulated mod. A modern & powerful regulated mod can do the same job, has more features and is often easier to use. Until you are experienced in vape coil building, and absolutely understand battery safety and ohm’s law, then you should continue using regulated devices. Many people never use mechanical mods.
Current (Amperage, Amps, I)
It would be smart to check if your device actual has the ability to use your new coil. When building the coil you should be careful to make it able to fire from 3 Volts – 4.2 Volts, before making the coil. we say 3 – 4.2 because this is the most common sweet spot range for the majority of users.
If you use a single 20amp battery in your device, or your device is rated at 20amps, then you need to draw less than 20amps. So we need to figure out the current (amps) the coil will require, and the amps your device can draw. To learn if your power supply will work with the amps of your new coil, we need to find:
- The amount of amps the battery/device is rated for, which is usually written on any of the following:
- The power supply itself
- The power supply packaging
- The manufacturer’s website
- Volts you wish to set
- Resistance of the coil
Watts divided by Volts will give you Amps, if your device/battery has an Amp rating higher than the number you just calculated then everything is fine, as long as you’re using a regulated device. If not, you will need to match the current calculation to the amp rating current accurately, and you mustn’t have amps higher than the rated maximum.
This is the formula to find Amps.
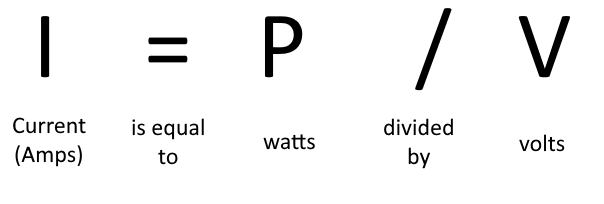
If the amps that will be drawn from your vape coil is a higher number than the rated amp level of your battery then it will simply not give you the power you are asking for. In a regulated mod this is safe but obviously not recommended. In an unregulated mod this is not safe. For Example, if you’re using a single 20amp battery in a regulated device:
| Resistance (Ohms) Ω | Current (Amps) | Power (Watts) | Voltage (Volts) | Will it fire? (Are less than 20amps drawn?) |
| 0.15Ω | 24.66 | 91.26 | 3.7 | No |
| 0.15Ω | 16.6 | 41.6 | 2.5 | Yes |
| 0.3Ω | 23.33 | 163.33 | 7 | No |
| 0.3Ω | 12.33 | 45.63 | 3.7 | Yes |
| 0.5Ω | 7.2 | 27.38 | 3.7 | Yes |
| 1.0Ω | 3.7 | 13.69 | 3.7 | Yes |
What wire should I use? – Pros and Cons
There are many different materials to pick from, all with their own personalities. Each have pros and cons, such as heat up time,which is how quickly the wire gets hot when power is put through it, and ease of manipulation. Read through this simple breakdown of our views of the pros and cons of each commonly used wire material. The most common materials are:
KanthalA1 | Kanthal wire |
| Pros | Cons |
| Easily manipulated | Can not be used in Temperature Control Mode |
| Very commonly stocked | |
| Cost effective | |
Stainless Steel 316L / Elite | SS316L wire |
| Pros | Cons |
| Easily manipulated | Can contain Nickel sometimes – potential allergen |
| Commonly stocked | |
| Cost effective | |
| Fast heat up time | |
| Works in wattage &Temperature Control Mode | |
Titanium 1 | Titanium wire |
| Pros | Cons |
| Easily manipulated | Only works in Temperature Control Mode |
| Holds shape | Reports of toxicity concerns |
| Cost effective | |
| Fast heat up time | |
| Works in TC mode | |
Nickel Ni 200 | Nickel wire |
| Pros | Cons |
| Cost effective | Only works in Temperature Control Mode |
| Very fast heat up time | Hard to manipulate |
Nichrome | |
| Pros | Cons |
| Cost effective | Not commonly stocked |
| Very fast heat up time | Low melting point |
| Easy to manipulate | Contains Nickel – potential allergen |
How to decide what you want from DIY Coils
For beginners it is recommended that you build a single Kanthal A1 coil, with a 3mm ID (inner diameter), and your target resistance is no lower 0.5Ω. There are still plenty of decisions to be made before you get started. Such as:
- Do you want one coil or two (dual build) on the same build deck?
- What ohm resistance you want your final product to be?
- Do you want to ‘sub ohm’?
- Which material should it be made of and the AWG?
- What (Clapton, twisted, tiger etc) do you want the style to be?
- Can your battery deliver the current (amps) that allow you to use the coil(s) at the wattage you want?
If you want a very low sub ohm coil then you may be better off using a Stainless Steel wire, such as Vapable’s ‘Stainless Steel SS316L Wire by Youde 30ft‘. If you want to build a custom coil then you need simple targets to hit so you’re not flying blind.
How to Plan & Calculate your Coil
How do I figure out what ohm coil to make? Well, before you begin building your coil you need to calculate everything you’re going to do. This is to ensure your end result matches your expectations; you need to know the coil will work as intended. As an example, A typical coil plan would look like this, outlining the following qualities:
- Single coil – 1 coil on the build deck
- 0.55Ω resistance – resistance of the end product
- Kanthal – material of wire
- 3mm ID, macro coil – coil’s inner diameter (size of the hole)
To achieve this we’d use kanthal A1 24 gauge with a 3mm diameter, fully wrapping the wire around the coil jig six times, this will be slightly over our 0.55Ωtarget, but this is close enough.
This was calculated this by using an online, purpose built, coil wrapping calculator. They will help you massively. Always use a coil wrapping calculator such as steam engine, even if its just to check that your own calculations are correct. Calculating the ohms without coil calculation assistance is far beyond unnecessary, as it can get very complicated with all the different AWGs, materials, wraps, heat loss, leg length etc.
To use the calculator you need to enter:
- The material the wire is made of, we’re using Kanthal A1, because it’s ideal for new coil builders, due to it’s easy manipulation and convenience to purchase.
- The style of the wire, we’re using ‘Round‘, you’ll know if it’s ‘Round’ if it is simply wire that hasn’t been manipulated, twisted up or wrapped around itself or another wire.
- Diameter of the wire, this is the thickness (commonly reffered to as gauge or AWG), we’re using 24 AWG.
- Single, Dual, Triple or more coils, we’re using a single coil setup. Some RDAs/RTAs can host multiple coils, depending on the space available.
- Target Resistance, we’re using 0.55 Ohms.
- Inner Diameter, commonly refereed to as ID. We’re using 3mm because it gives plenty of room for cotton, and is big enough for beginner’s to grasp easily.
- Leg Length, this is the length of the prongs that come away from the coil, this doesn’t have a huge affect on the end result of the coil’s resistance or funtion, 4mm is good enough for our purposes.
Back to the coil, it’s 0.55Ω and best practices dictate that we should aim to power it at 3.7V. We will use the calculation from the ‘power & voltage’ section to find number of watts we should use: (3.7 volts x 3.7 volts) / 0.55Ω = 24.89 watts. So we want to vape at 24-25 watts.
Keep note of these figures if you want to follow along, step by step, in the “How to build a vape coil in 7 easy steps”.
Macro vs Micro Coils
Micro coil and Macro coil are both terms for vape coils, only differing in size.
- Micro coils have an inner diameter (size if the hole) of 2mm or smaller
- Macro coils have an inner diameter wider than 2mm
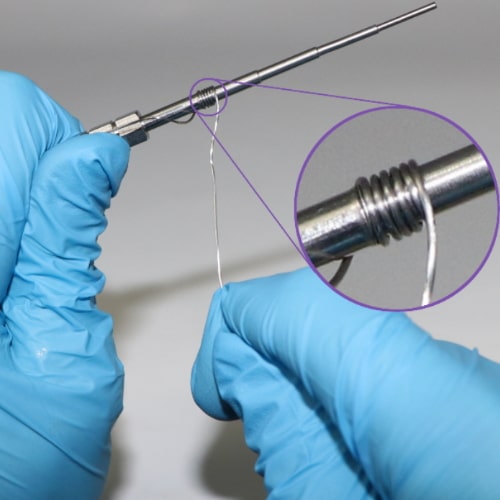
How to use a Micro Coil Jig
The second tool is using a Micro Coil Jig, which is essentially just a metal spike with gradually decreasing diameters for you to wrap around. If you want a 3mm inner diameter then wrap around the 3mm section as many times as your target calculations requires. Hold down your wire tight and parallel to the coil jig and begin turning the coil around the section you’ve chosen. Be sure that the coils are tightly wound and closely packed without gaps and not overlapping for an evenly heating coil.
Finishing the wrap should leave both of the legs of the coil pointing in the same direction, this is for installing it in your RDA, unless your device requires otherwise. Any screwdriver or drill bit that you know the diameter of could also be used to wrap.
How to use a Guided Wrapping Tool
Using a guided wrapping tool such as the ‘Coil Master V4 Coiling Kit Jig’ will wrap your vape coils perfectly using a purely mechanical process. Simply set your inner diameter, slide your wire into the device and turn it for however many wraps you want, in my case this is seven wraps. This can make wrapping much easier and more accurate than using a manual coil jig.
How to get the most value out of your vape coil and cotton
If your cotton is black, brown or charred but feels ok, we would recommend changing it, however it really is up to you. Some of us in the office re-wick our coils daily, some do so weekly, and others whenever the quality of the vape feels considerably lower than the high standards set by a fresh wick.
No one likes a burned coil, especially not just after you’ve re-wicked the coil, so we made this 6 minute guide for making vape coils last longer. Keep in mind, this is directed at stock coils, but the principles are the same as DIY coils.
To change the wire coil, simply reverse the process you used to install originally. Coils can go for weeks, or even months without needing changing, if given proper care and attention. The average time wire coils last for us at Vapable is around a month. Some people’s will last longer and some shorter.
To make your wire last longer you should be cleaning it after each re-wick. There is no need to remove the coil for this process. Once the old cotton has been pulled out you should make sure the coil is cold or only slightly warm and wipe it down with tissue, be sure that the coil isn’t hot enough to burn the tissue or yourself when doing this. After that, you can dry hit, pulsing the coil with no cotton installed, this will burn off any residue left over from the previous liquid. Give the coil some time to cool off and you can then re-wick the coil, good as new.
A wire coil is truly dead when it fails to be read by the ohm meter or your e-cig mod. Or when it is deformed (from the heat) in such a way that wildly effects the ohm reading. Time to start use the information from our vape coil guide all over again!
How to make Vape Coils
After reading this comprehensive article on the ins and outs of preparing to make a vape coil, you should move on to our building guide that shows you how to build a vape coil in 7 easy steps!
Thank you for reading our beginner’s Vape Coil Building Information Centre! I hope you have as much fun physically building coils as we did building this guide! If you’re really getting into this you should join our Facebook group to meet like-minded people, discuss coils, other vaping related topics and share ideas!
